Version Control and Collaboration with git and GitHub
#
A key part of doing research is being able to account for how you got from your data to you findings, and being able to inspect how your project has changed over time is important to that process of accounting. Whatmore, we all want peace of mind as we do our research so that if we make a mistake, we can go back and do it over again. Version Control is a term for the process of developing a set of files and accounting for how they have changed over time. Software engineers need it as they are developing code and releasing it to users, they need to be able to ensure that it is compatible with other software. There are manual ways of doing version control, such as keeping all the old copies of documents in an archived folder, but adopting some software can help automate the process and ensure that there are no hiccups, while also allowing you to keep an elegant organization to your project directory without endless copies of nearly the same documents.
Modern Version Control software also allows you collaborate on files with others and then distribute them as well. In this chapter I will cover how to use this version control software, which runs on the terminal, so be prepared to open a terminal and type in commands. We are also going to try to collaborate on some documents together using GitHub. To do that, and to take full advantage of git for version control and backing up your work, you will need to sign up for a GitHub account. If you followed along in
Chapter 4 you should have git already installed but if you didn’t you can install it from
here.
GitHub is free to use and allows you to have several private repos for free (we will cover what a repo is shortly, but it is just a directory of files you are tracking). You can pay to get unlimited private repos and some other bells and whistles. You can even host your website on GitHub. If you are worried about the security of your code or data on GitHub you can review their data use policies here. To sign up for a free account follow this link.
What is Version Control? #
Version control refers to software that tracks the changes in groups of files. In academic research i will allow you do a few things: You’ll be able to revert files to a previous state. So if you get some feedback from your peers and decide to rework your analyses or the current draft of your next big article and recirculate it and get even more negative feedback, you can immediately go back to the previous version and start over again.
Before going immediately going back to the previous version you can compare different versions of the file as long as you have been tracking it and telling the version control software to keep tracking it. You could even revert your whole project to a previous state if you realized you went down the wrong rabbit hole and need to start again from some more secure footing. even more importantly you can create branches in your project that lets you experiment with something new, all the while the canonical version of your project is safe and sound. And if you’re collaborating with someone, you can see who authored particular changes.
Essentially these are also the basic reasons that you should use it:
- It keeps a record of everything, which means that you don’t need to keep extra copies of your old versions of files because they are secure in the version history of your project.
- There is a backup of everything. You can get old versions of files from the version history.
- You’ll be able to distribute the final project code and all directly to your audience by sharing the repository.
With all that said, it is important to note that version control is a tool in data management, and not a silver bullet. As is true about pretty much everything else in doing good resaerch, there are no substitutes for conscientiousness.
There are two varieties of version control: local and distributed. You can see an example of local version control in Figure 1. Version control keeps a snapshot of your file overtime (Version 1, 2, and 3 in the figure) and you are typically working on the latest version. You decide when to take a snapshot so there is some discretion in the process. It is not like a google doc that is constantly looking at every key stroke and edit you make. Local version control is limited in that if you lose your laptop that has the version history on it, then you lose everything. There would no backup unless you kept backups of your files remotely on something like iCloud or Google Drive. Also, if you are collaborating with some colleagues, you would still have to pass around files via email.
Distributed Version Control is a system for keeping a log of all the changes that have occurred to a set of files, and storing copies on a remote server, as is shown in Figure 2.
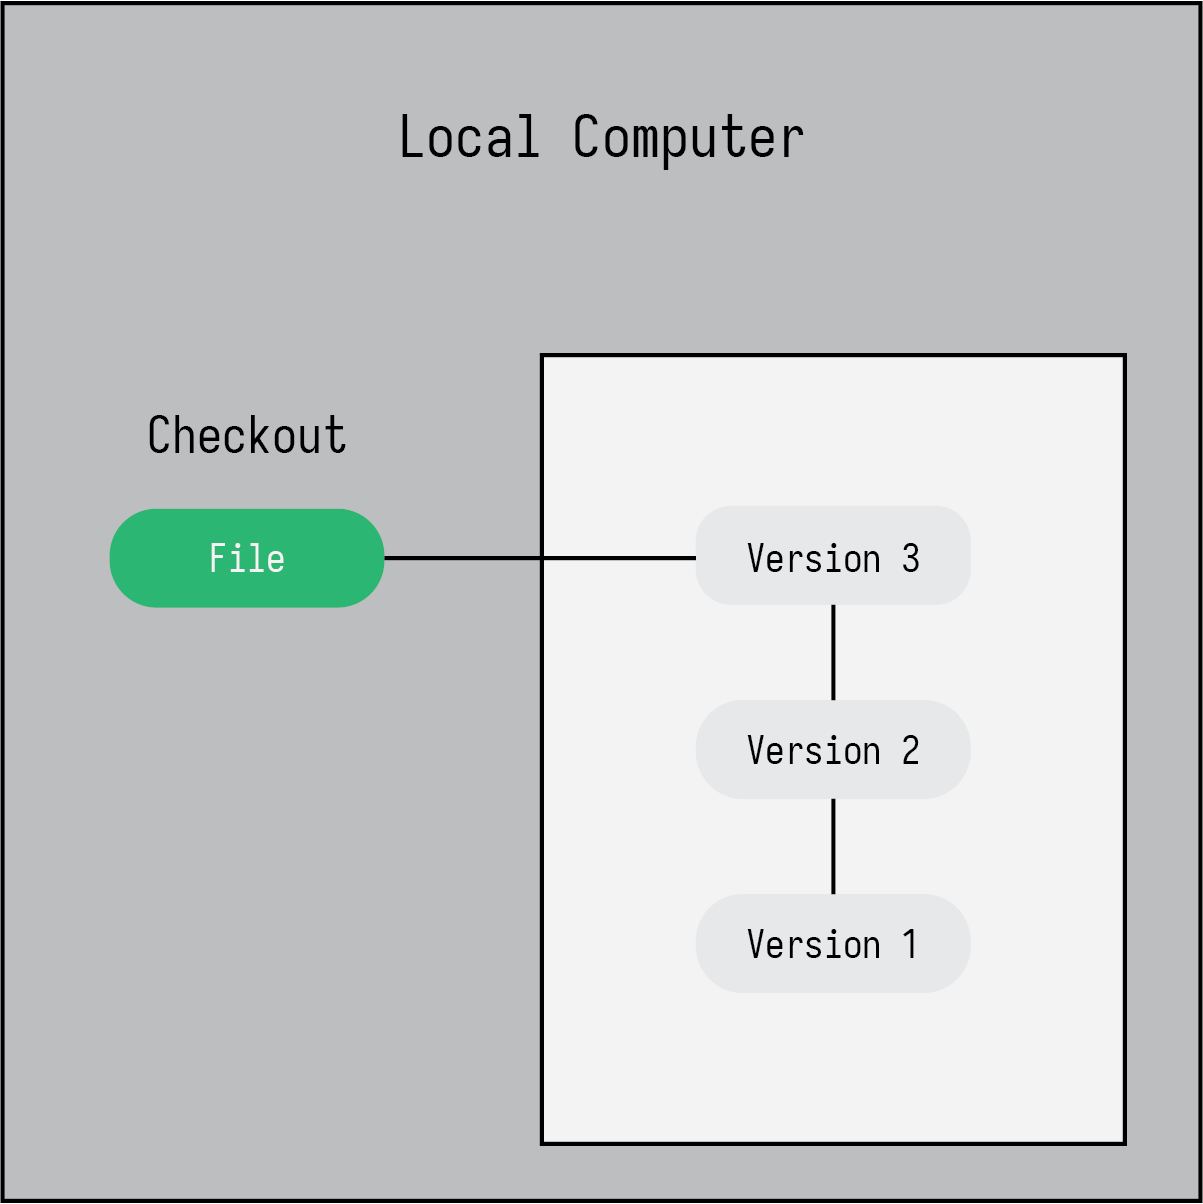
Figure 1: Local version control on a single computer.
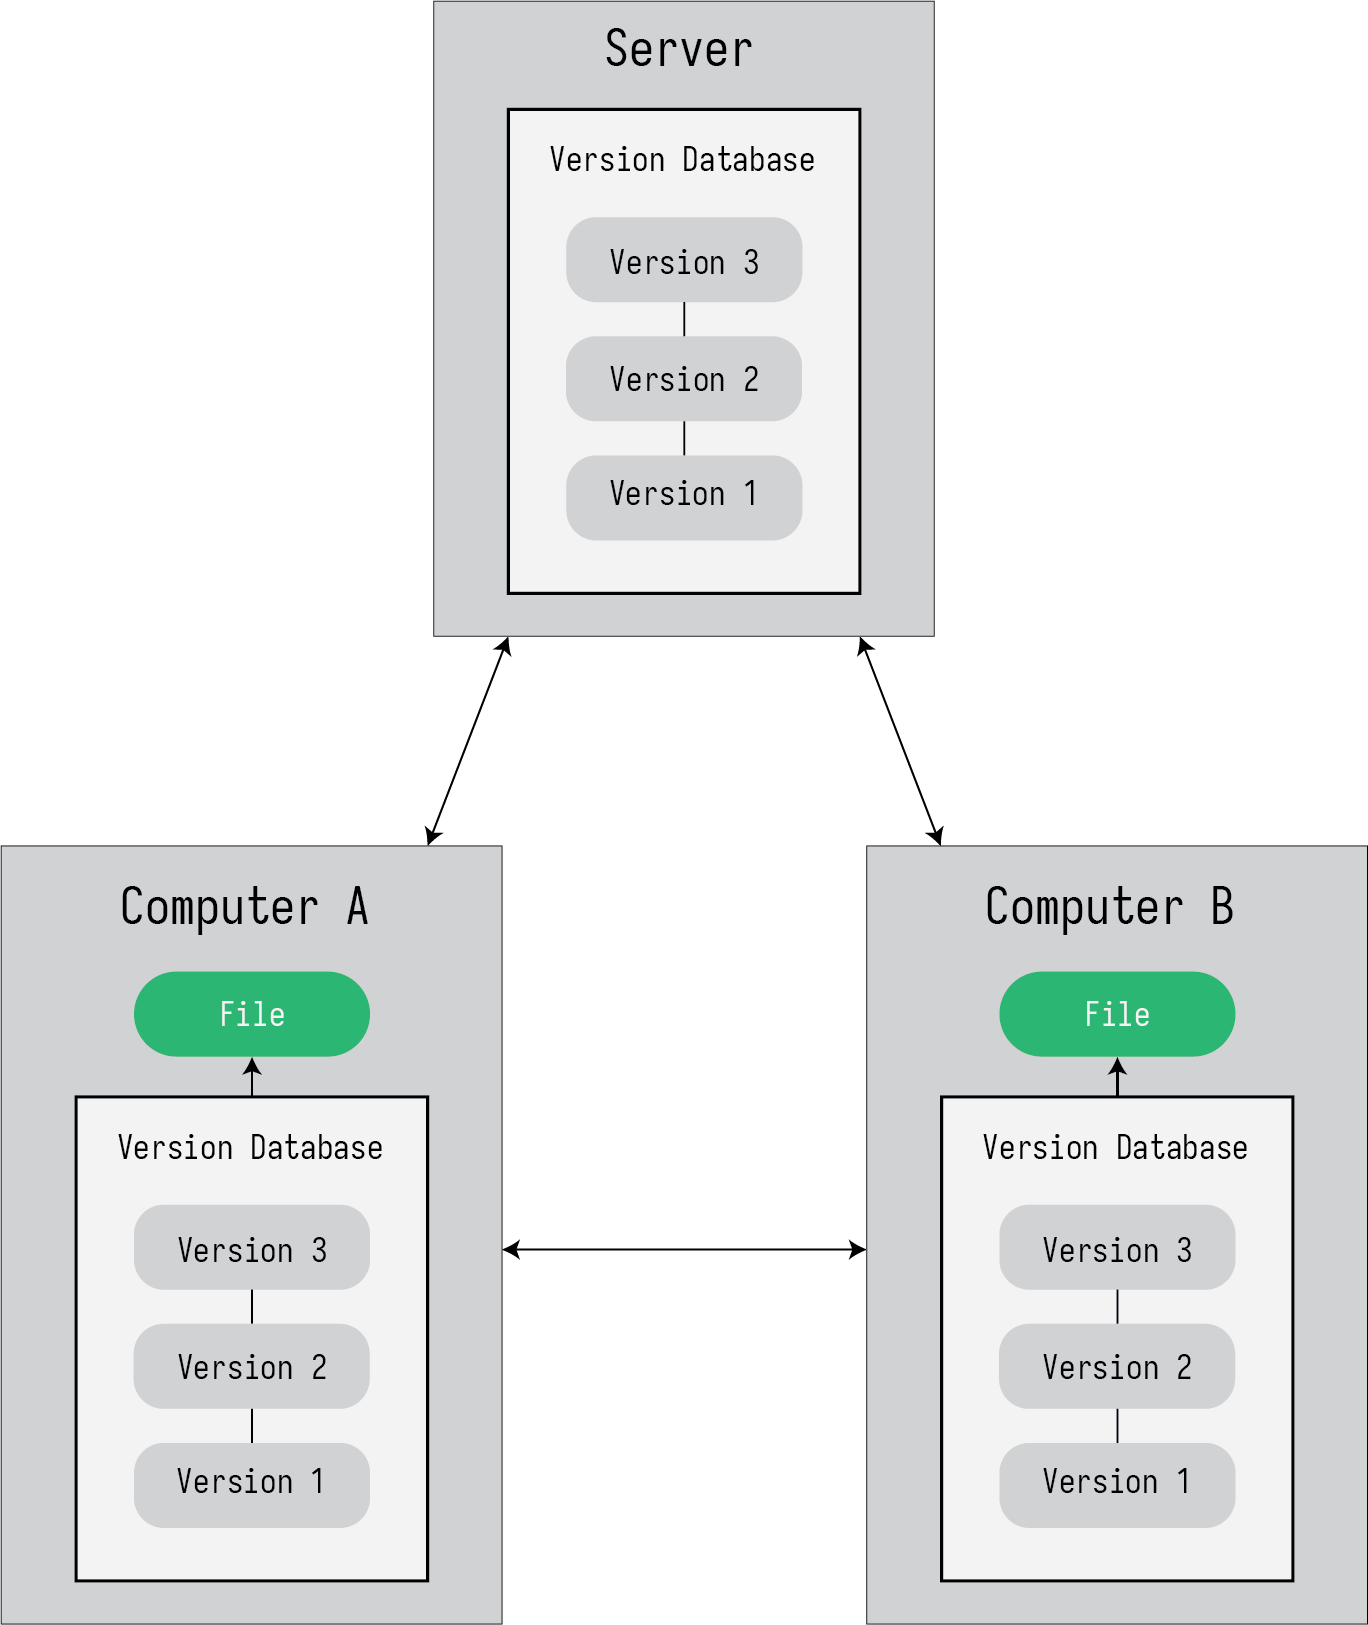
Figure 2: Distribted version control with a remote repository.
git
#
git is one of the most popular version control softwares out there. It is fairly simple to learn and very powerful but getting started using git can be a bit of a hurdle, and I have even known the smartest of graduate students abandon the attempt to learn it after a few tricky mistakes were thrown their way. This is in part due to the fact that there is a little bit of an esoteric vernacular associated with version control that is impenetrable at first. Before diving into how to use it we should get clear on some language first.
- repo
- A repo is shorthand for repository, a repository being the database that stores all information about the version of your files.
add- This command adds files that you want to track in the version history. There are a few fancy tricks for adding files. For example if you wanted to add literally everything in your project directory you would use the command
git add ., if you wanted to add all the R files in yourcodedirectory you would rungit add code/*.R. - staging area
- When you add files to be added to the version history of your project, before creating a snapshot they are added to what is referred to as the staging area, which will list the files and their statuses that will be preserved in the version history. You can add or drop things as needed from the staging area.
commit- This command creates a snapshot of the files that you have added to the staging area essentially creating a version of them in the version history of our project.
git stores the complete history of all the files and all the files changes that have occurred in your project and not just the current files you might have.
Now you are ready to start to learn by doing. So follow along with the next few steps on a repository that you can try this out on. One that has a couple of subdirectories of plain text files that you can experiment with, and not one of the directories you have installed from the templates, as those are already git repositories.
To get started you first initialize a directory with a git repository by opening a terminal, changing the directory to whatever directory you want to track and running git init. The terminal should return Initialized empty Git repository in /Users/timothyelder/Documents/YOUR-DIRECTORY/.git/. That is the path to the specific .git repo directory within your directory that will store all the information about the files you track. If you remember what we learned in
Chapter 2, directories and files that begin with a period are hidden from view in a regular Finder or File Explorer window. You can now run git status to ensure that it is running and it should print out all the files in the directory and its subdirectories. They should all be in red because you haven’t added anything yet to the repository.
When you are working on a project with plain text software like LaTeX, they generate lots of extra files that you don’t really need but that help the software typeset your documents. Sometimes you also have .log files that you don’t want to be tracked in your version history. Luckily, git has a system for ignoring specific file names and file types. To do that we are going to create another hidden file. You can create this file using a text editor or directly in your terminal with vim. We are going to cerate a .gitignore file which git recognizes and uses to ignore certain files.
Go ahead and create the file using vim by typing into the terminal in the directory vim .gitignore. Then once you have the file created you can put in the file extensions that you don’t want tracked. I typically ignore files that are generated by OS as well as LaTeX log files that get generated while typesetting documents. So a typical .gitignore file looks like this for me:
# OS generated files #
######################
.DS_Store
**.DS_Store
.DS_Store?
._*
.Spotlight-V100
.Trashes
ehthumbs.db
Thumbs.db
**.icloud

# LaTeX generated files #
#########################
*.aux
*.lof
*.log
*.lot
*.fls
*.out
*.toc
*.fmt
*.fot
*.cb
*.cb2
.*.lb
If you have files that end in these extensions then and you run git status again, then you’ll notice that they don’t appear now when you run that command. Now that you have the repo initialized, a .gitignore file created, you are ready to add files to be tracked by git. Typically you’ll want to initialize a git repository early on in your project when you don’t have to many files in your project yet. To add everything to git tracking you simply run git add .. The period at the end of that command means “everything”, but it won’t add things that you are specifically ignoring. Go ahead and run git add . and then git status again. Now you’ll see all the files that were red are now green, meaning that they have been added to the staging area to be added to git tracking.
The final step is to create a snapshot of the files that you have added to tracking, what is otherwise known as a commit. Every commit requires a small message, typically under 80 characters, that describes what is the content of the commit or what changes have been made. You keep these messages short so they can be red in a single line. To make a commit with a message you run git commit -m ”init commit” or whatever else you might want between the quotation marks.^[If you just run git commit without the -m flag, your terminal will open up a vim Window and you’ll be able to leave a larger message. The convention is to keep the top level commit message to less than 80 characters, and then include however much test you want with a similar character length below it.] Now, you have made your first commit and it is stored locally on your computer.
Thus far we have run the following commands:
git init                      # initialize tracking
git status                    # shows the status of tracked files
vim .gitignore                # hidden ignore file
git add .                     # adds everything to tracking
git commit -m ”init commit”   # creates a snapshot of the project
Now when you work on your files you should start to get into the habit of making commits on a regular basis. If you are working on your project every day, all day, then one or two commits a day is not a bad idea. If you are only working on one file in your project on any given week and not much else is happening, then a commit a week is just as good. It is up to how conservative you want to be in your versioning. It is free, so you can be as fastidious as you want to be.
After you have a group of files being tracked and a few commits made you’ll have a version history that looks a little like Figure 3. In this figure we have a repository with three files and five commits. git prizes efficiency so it does two important things: first, it doesn’t keep exact copies of the files that you are tracking but a complete log of all the changes, so the full information about the file is conserved while the size is not. Second, it only stores new information when a file is changed. So in Figure 3 between the first and second commits, only files A and C had any changes and the delta between the two files are sotred while no new information is lofgged in file B because no changes ocurred. Between commmits 2 and 3 changes only occurred in file C. File B only gets a change at commit 4 and so it is updated from the initial version.
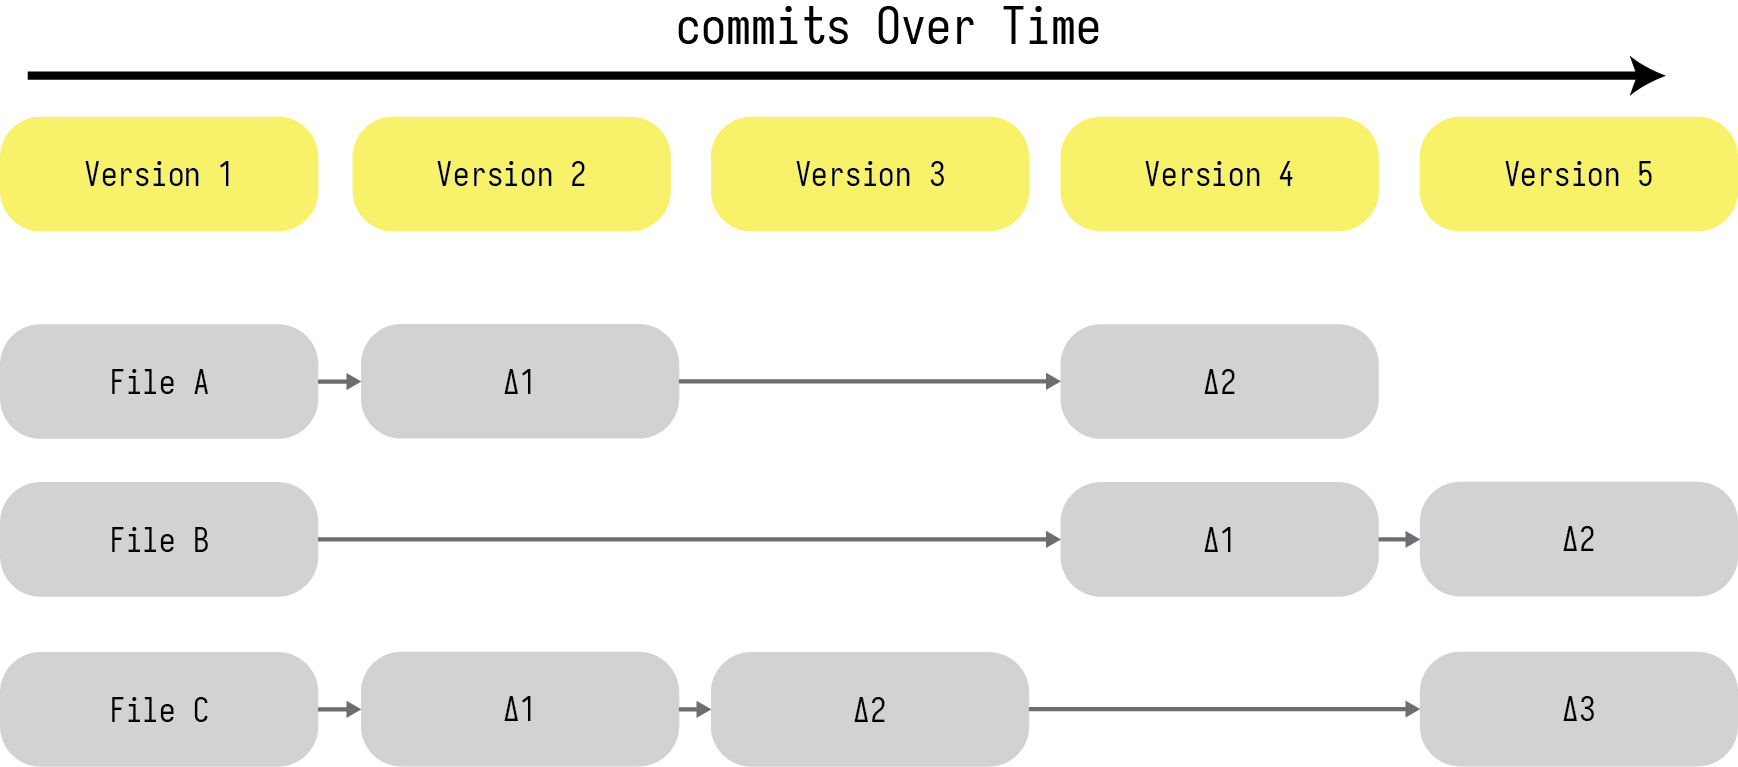
Figure 3: How versions are stored over time as you make `commits`
Another way of visualizing this can be found in Figure 4, where instead of showing the changes between different commits across files, it shows the snapshots of the repository, as it might appear in your finder, but with the extra time dimension to show changes over the commits. As you can see in each of the commits all the files appear because none of them get deleted. You should note that their version numbers change to reflect the changes that occurred in Figure 3. Files A nd C become files A1 and C1 between commit 1 and 2 while file B remains unchanged. File C1 becomes File C2 between commit 2 and 3, and so on and so forth.
This is in part indicative of the underlying strengths of git: rather than copying files endlessly, git compares files and their changes, storing the deltas between versions so there is a complete history of the files and how they have changed over time. There is some cryptography under the hood that ensures everything is as it should be and generates a key for each commit and allows you to retrieve files from commits using these keys. It can be a little confusing to deal with this kind of system at first but it quickly becomes second nature once you start using it regularly.
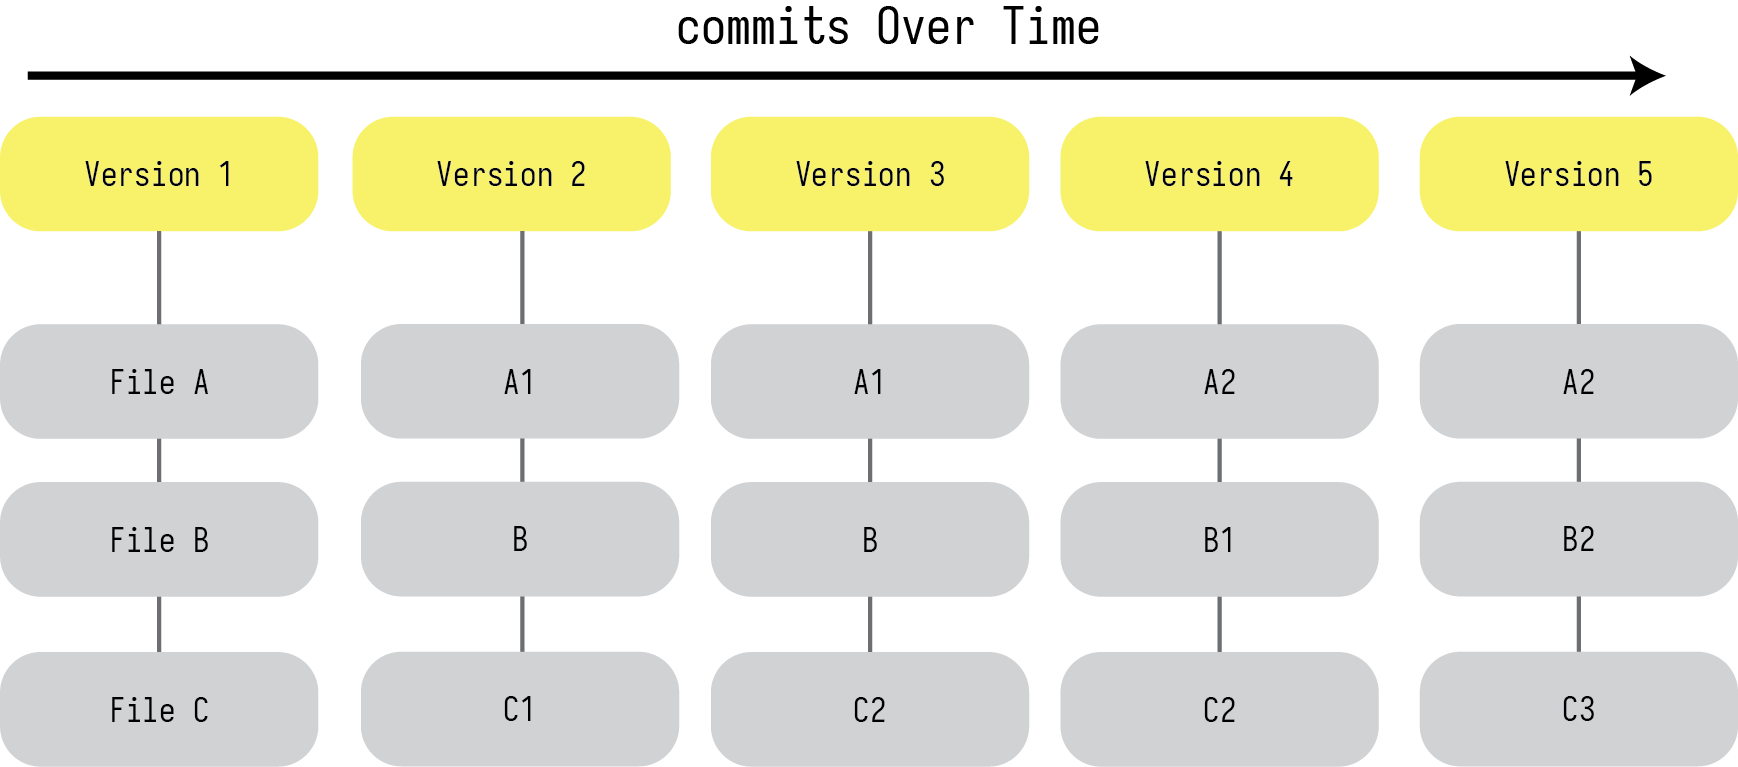
Figure 4: Another way of thinking about how versions are stored over time.
In Figure 5 we visualize how the process of working in this work flow looks. You are working in your prject directory (the working directory at the left hand side of the figure) and once you are ready to make a commit, you add the files you want (the git add arrow in the center of the figure) to the staging area, where they wait to actually be added to the version data base (the .git repository on the right).
There is one addition to this figure that we have not covered which is the git checkout command. git checkout is a part of the branching capability that git has which allows you to create parallell versions of hyour project to experiment with. This is most helpful to quantitative people who are going to be having lots of code files that they are working with.
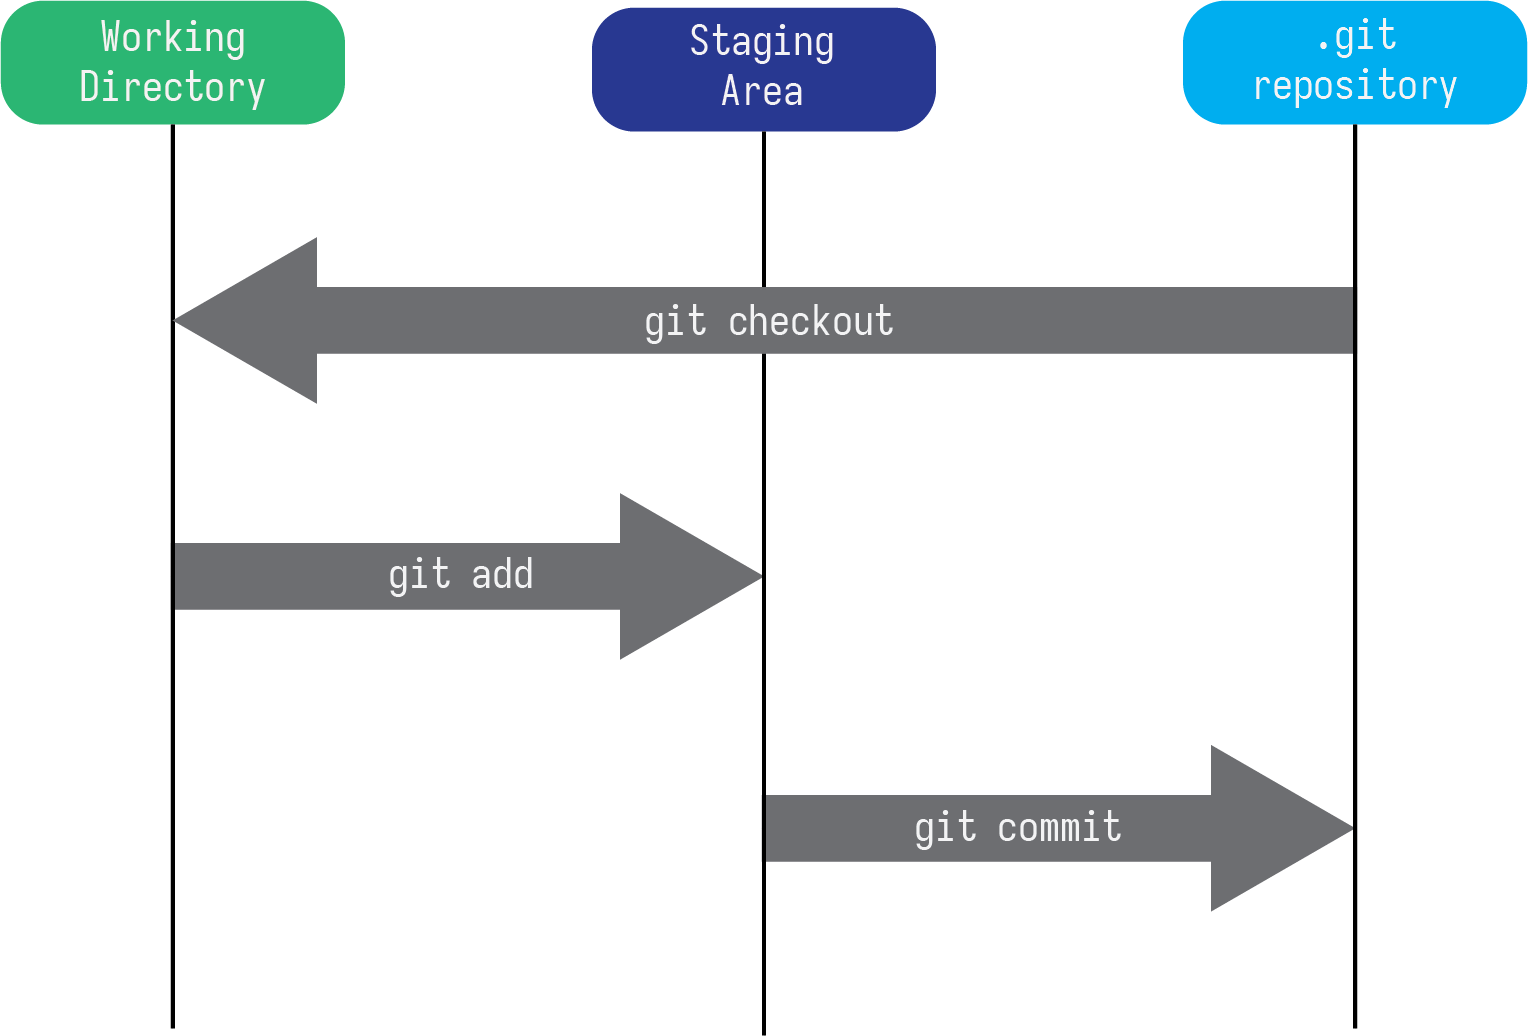
Figure 5: `git` workflow with only local repository.
For example, in one of my projects, I had a lot of scripts that handled all sorts of data cleaning and generation tasks, and they were all written iteratively so that they all relied upon one another in a slighlty confusing network of code. I wanted to ensure that the process for data generation was streamlined, but I wanted to be able to ensure that I was able to generate the data the same way I had before, so whatever new procedure I had could be checked against the original. To do that I created a branch of my project directory that allowed me to significantly change the scripts without having any fear that I might lose something, and without having to literally copy the folder and keep extra versions of things on my computer.
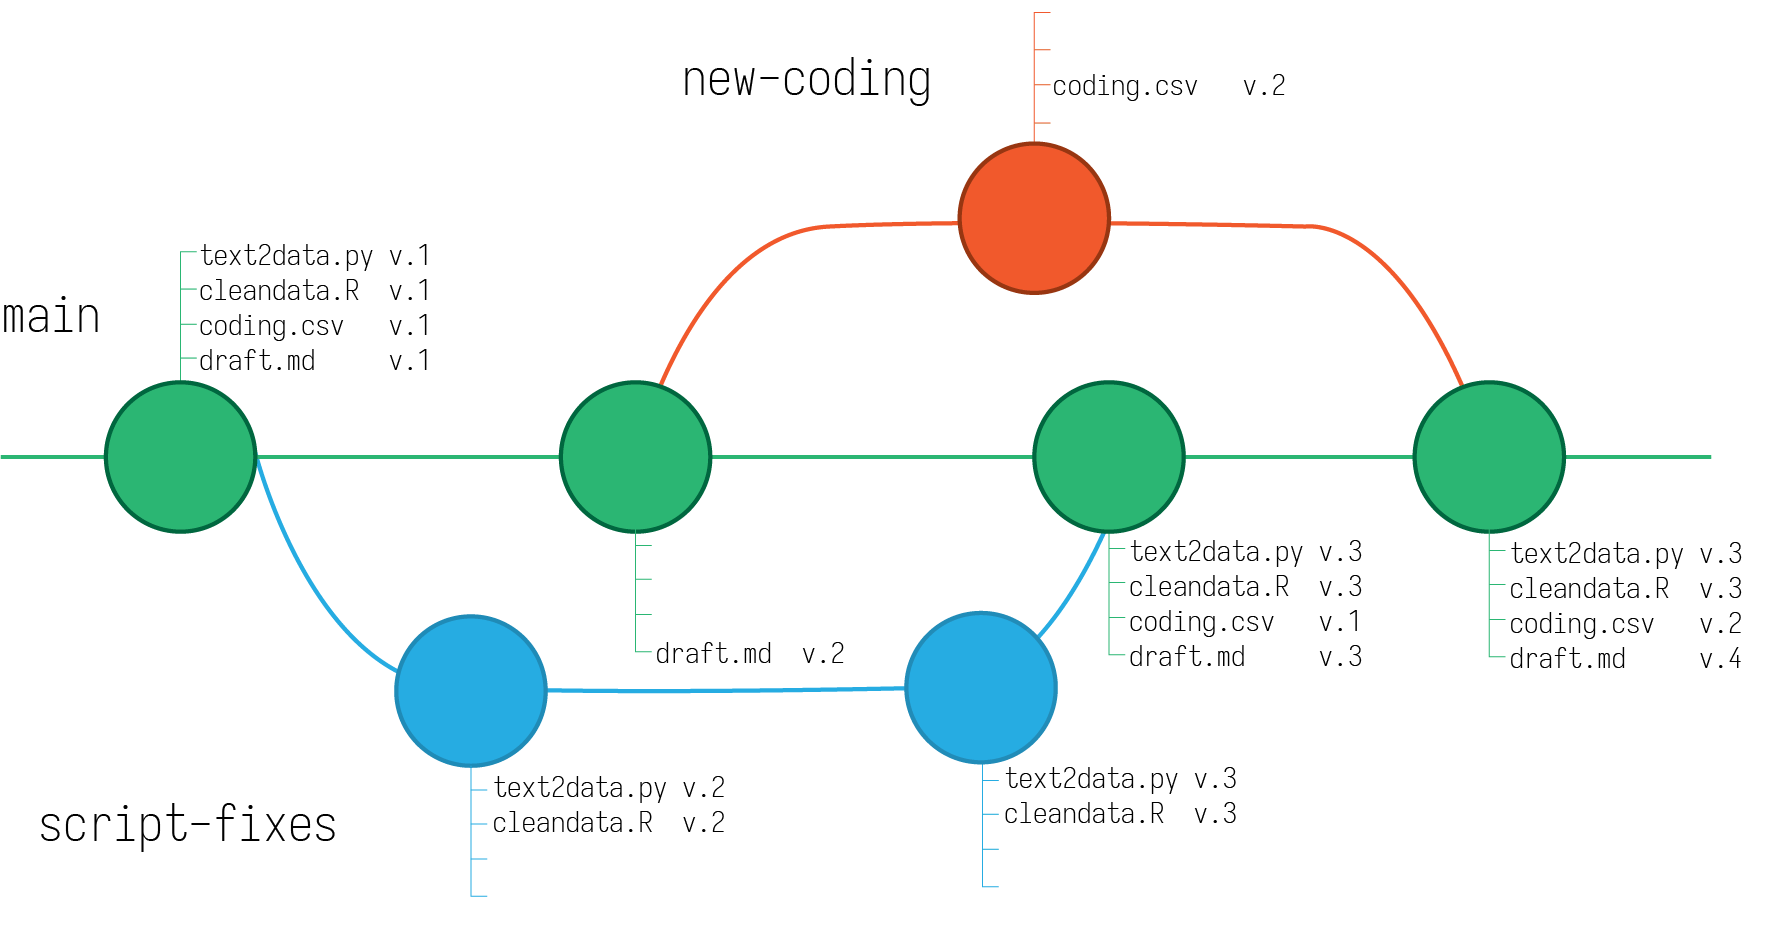
Figure 6: Branching versions of a project repository.
GitHub #
GitHub is the cloud-based service that complements git. If you sign-up for a free account you can create remote repositories to backup your local repositoeies. This has two helpful use cases: for one you can ensure that no matter what happens to your local files you will still have a complete history of your project stored remotely. Further, you can use it to collaborate with colleagues remotely.
Now there are a few extra pieces of jargon to learn now:
- remote
- The copy of your repository stored on GitHub.
push- Send current local versions to the remote repository.
pull- Get any changes from remote repo.
clone- Copy a remote repository to your computer.
- HEAD
- The canonical top level commit of a repo.
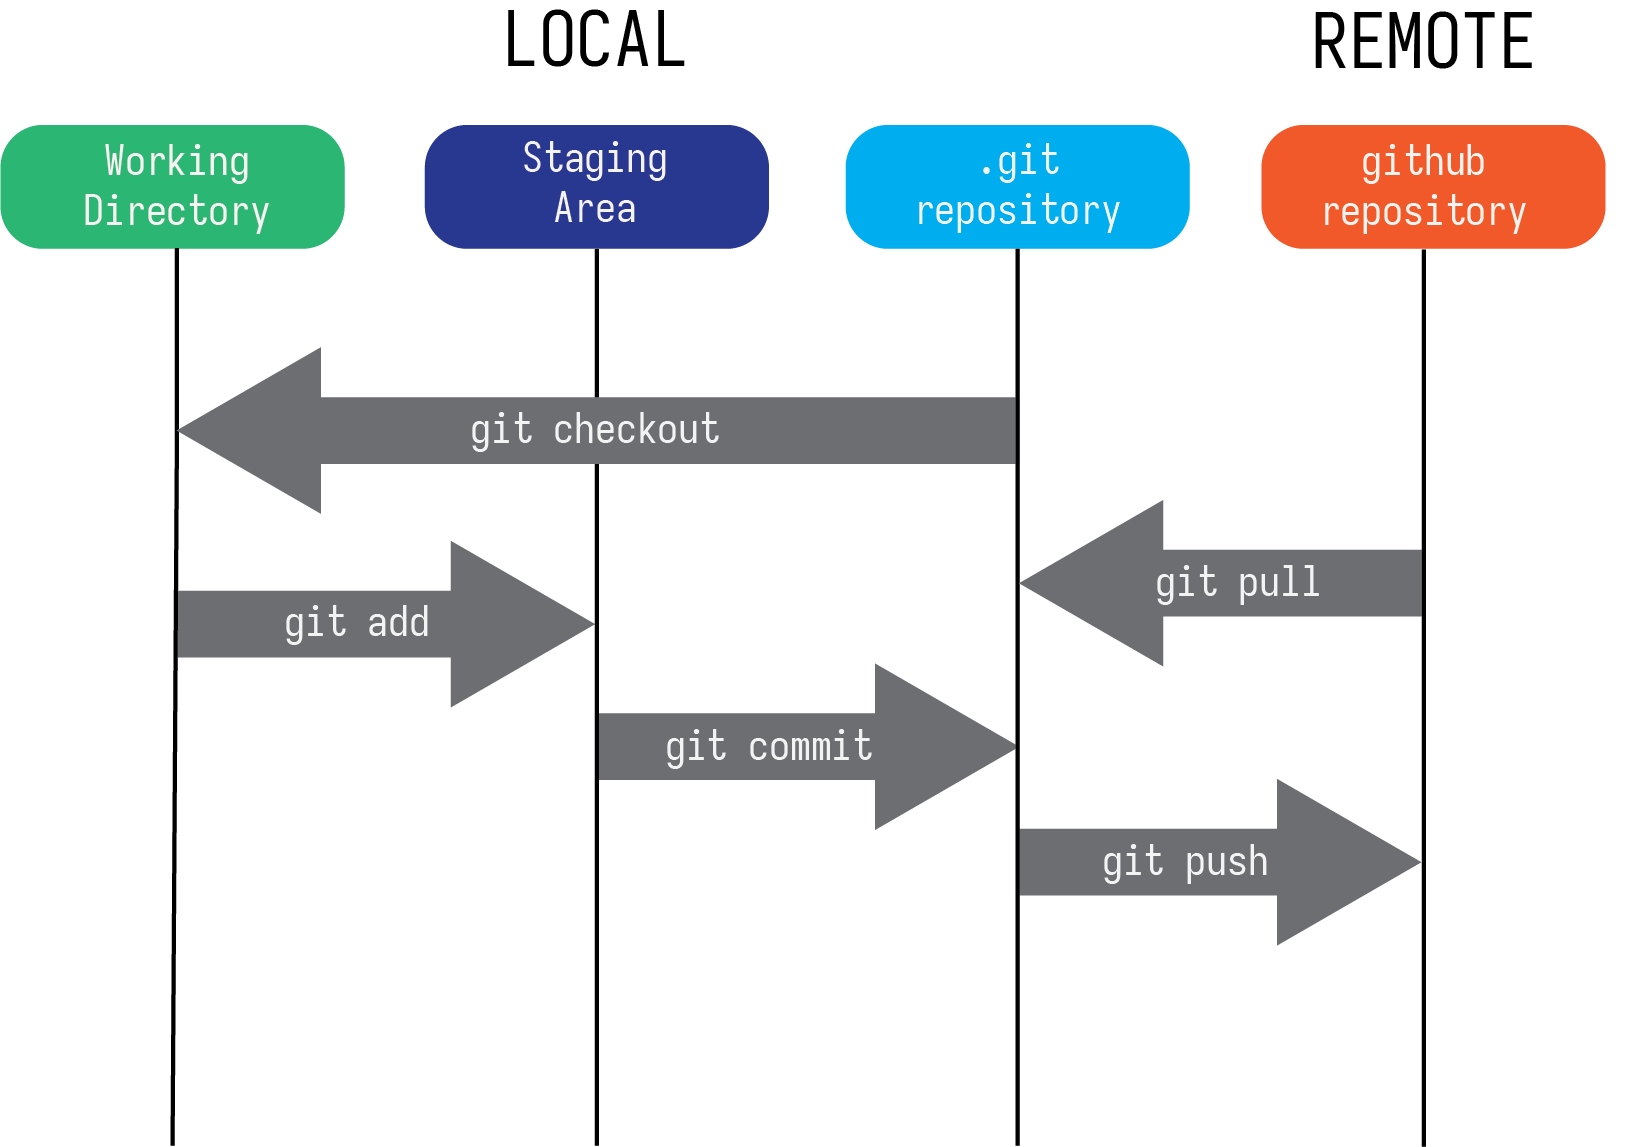
Figure 7: `git` workflow with local repository and remote repositories.
git config
#
Once you have an account with GitHub you’ll need to tell your local installation of git what your credentials are. This is referred to as your git config. You’ll need to do this only once and make sure you know your GitHub username and the email that you use for your account.
You can list your current config settings by running git config --list. To get specific settings you can run git config --get user.email. If you haven’t set up these settings they should return nothing. What we want to do is to set your config settings so that no matter where you are working on your computer, git knows what your confg settings are, these are referred to as your global settings.
For me, I set these settings using the following commands.
git config --global user.name "TimothyElder"
git config --global user.email "timothyelder@uchicago.edu"
You will need to substitute my user name and email for your user name and email. Go ahead and do that now in a terminal. It won’t matter where your terminal is open because the --global flag will create a configuration file in a standard directory that is accesible anywhere on your computer.
Personal Access Token #
There is one tricky part of using GitHub that reliably trips people up. GitHub is very concerned with ensuring that the security and your code is airtight. This is in part because of how ubiquitous the platform is for hosting and distributing large pieces of software that are used by lots of people.
A personal access token is a little piece of cryptography I think that verifies who you are and is required for pushing and pulling to and from GitHub. It is sort of hidden but I will walk you through the steps. You can attempt to do it on your own following the instructions on this page but I will also enumerate the steps here.
Make sure that you have already installed git to your computer and signed up for a github account via the links above. To make sure that git is installed (it will not appear that in your applications folder) open up a terminal and run the following code: git --version. If git is installed then it will return something like git version 2.21.0 (Apple Git-122). If git is not installed then it will return something like git: command not found.
Save Personal Access Token
Be sure to save your Personal Access Token somewhere on your computer because you won’t be able to see it again after making it.
- go to the home page of your github profile and on the upper right hand corner click the icon that has a picture, at the bottom click settings as in Figure 8.
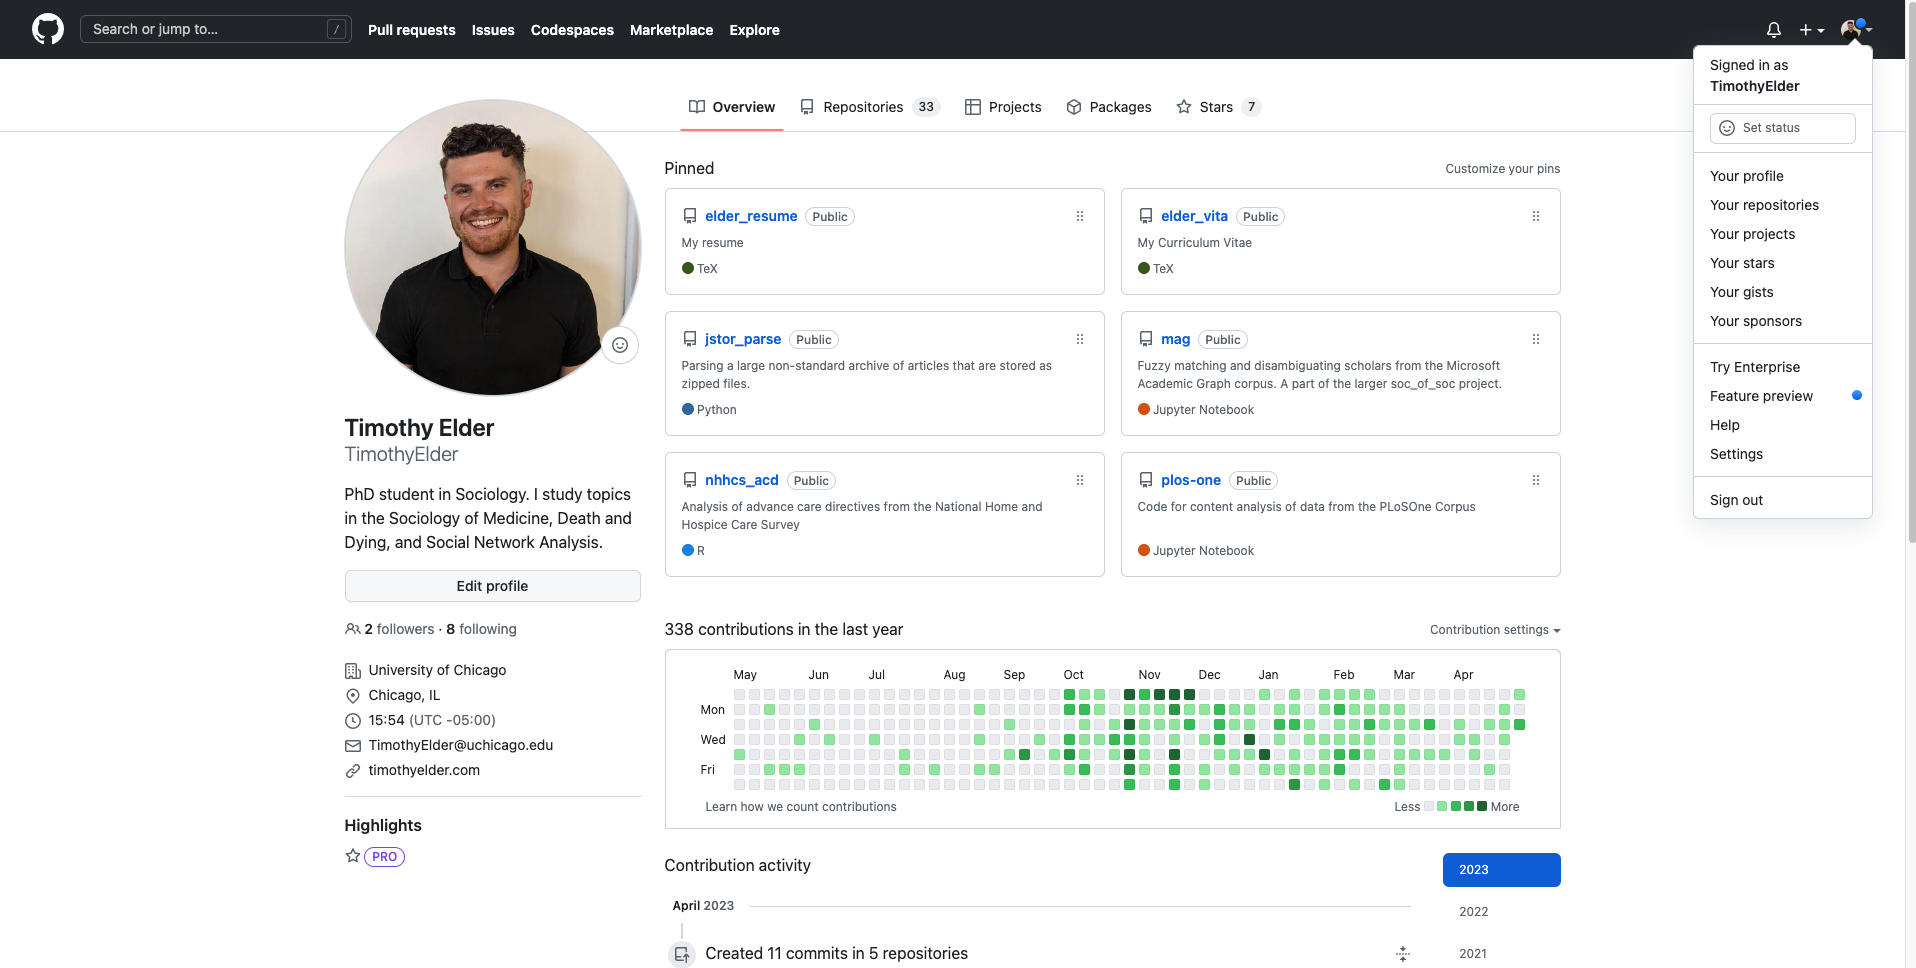
Figure 8: A GitHub profile page with publicly available repos.
-
On the left hand sign of the screen there are a list of options, at the bottom is an entry called
< > Developer settings. Click on it. -
On the bottom left hand sign click on
personal access tokensand thenTokens (classic). -
On the top right hand screen click on generate new token and pick the “classic” option. See Figure 9.
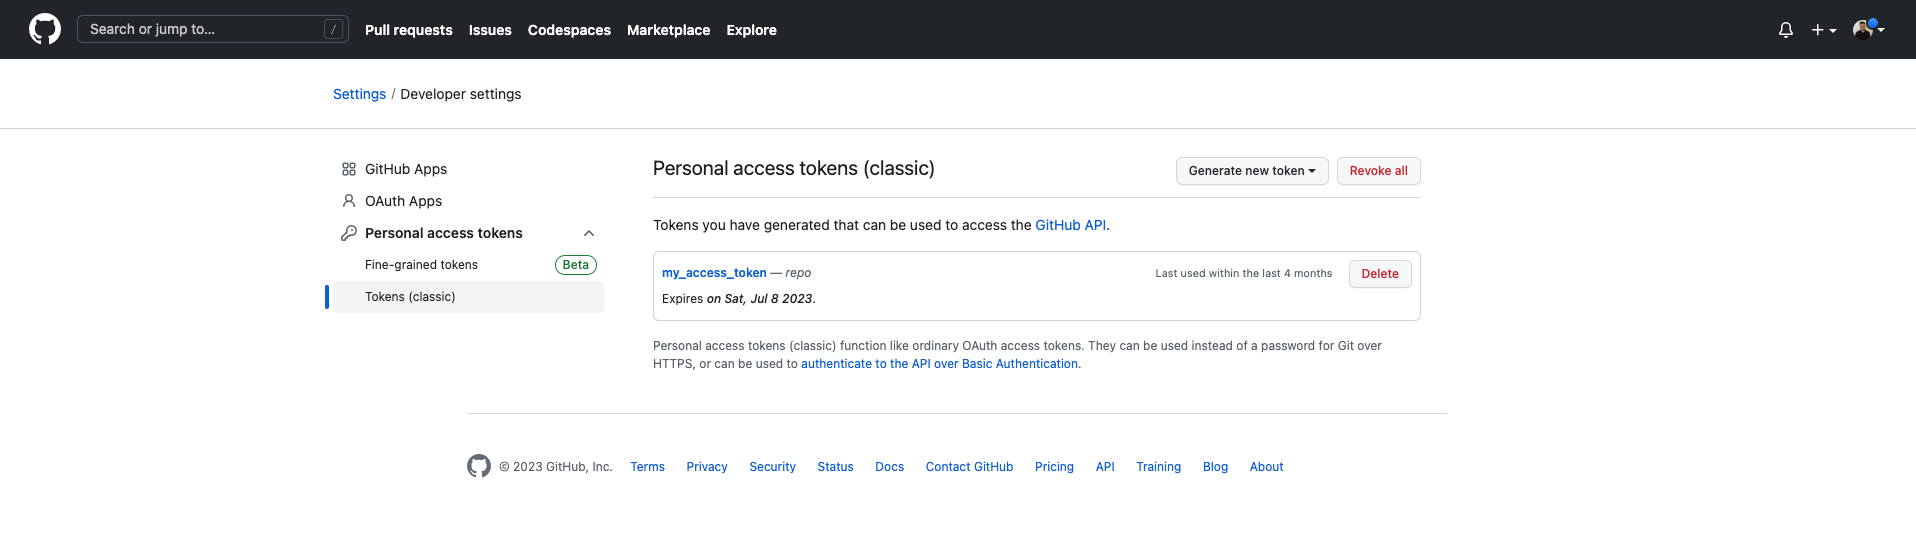
Figure 9: Settings for your personal access token.
- Give the token a name in the “Note” field, mine is “my_access_token”, set the expiration to “90 Days” and then click through all the options below that. Then generate the token and note the token that is returned to you. You must note down this token as you will not be able to see it again and you will need it. But do not fear, if you forget it, lose it or fail to write it down, you can regenerate the token. It will be redundant, but far from catastrophic.